Find the Software section and click on MultiPHP INI Editor. If you don’t have the MultiPHP INI Editor but do have the PHP Configuration tool, you can skip to the “If you don’t have the MultiPHP INI Editor” section.
In the dropdown, select the domain for which you wish to change the maximum upload size.
Find the following values and set them accordingly: upload_max_filesize = 64M post_max_size = 64M memory_limit = 90 file_uploads = Enabled
Click Apply to save your changes.
After these changes go back to Media > New and see if limit has increased from the auto 2MB
image is broken so cannot access the admin section….. WP Limit Login Attempts is not working
FTP into your site and go to /public_html/wp-content/plugins/ rename wp-limit-login-attempts TO x-wp-limit-login-attempts You should be able to login to your dashboard now.
How to Add Meta Descriptions in Divi (Easy, No Plugin)
by Asad Badat | Jul 1, 2021 | Divi SEO https://asadbadat.co.za/divi-seo/divi-meta-description/
Want to add your own meta descriptions on Divi without having to install a plugin (like Yoast or RankMath)?
Good news!
With the built-in custom fields option, you can specify a meta description for an individual Divi page or Divi post direct from the WordPress Dashboard.
It takes less than five minutes to setup initially and once-off. Also, there’s no funky code, plugin, or theme files to worry about.
Let’s get started…
Tutorial: Setting up Custom Meta Descriptions on a Divi Theme Website, Step by Step
Step 1: Enable Custom Meta Descriptions in Divi Theme Options
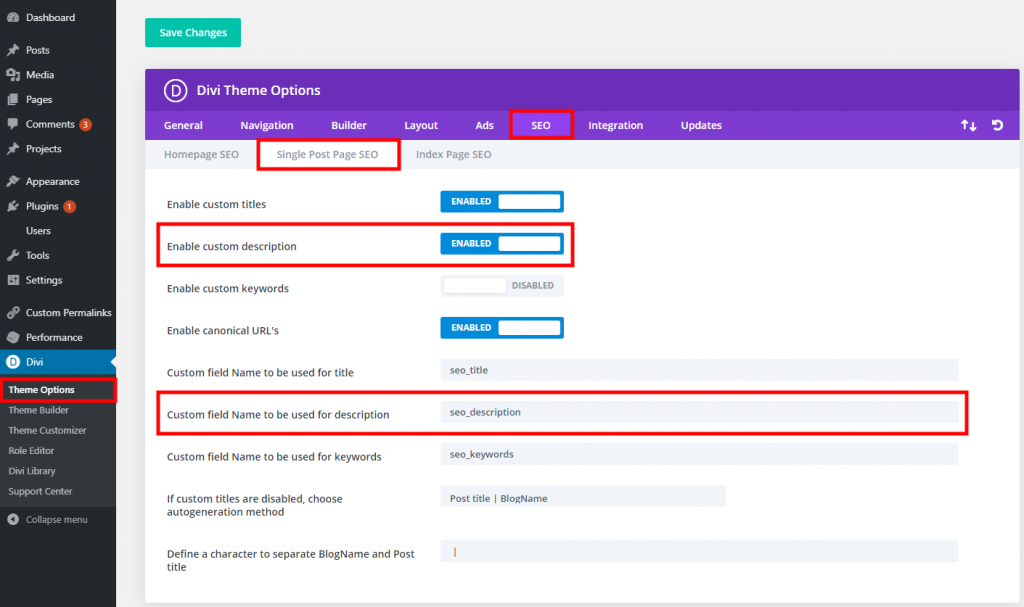
We’ll be using custom fields for adding meta description on Divi. But first, we need to enable this on the Divi side:
Open your WordPress Dashboard and select Divi from the sidebar.
The Divi Theme Options page will now open.
From the Theme Options header tabs, select SEO.
From the three sub-tabs, select Single Post Page SEO.
Set Enable custom description to Enabled.
Several fields below is the ‘Custom field Name to be used for description’ text field. The default is: seo_description. If yours is different, change it to this default. Otherwise, no action is needed.
Hit Save Changes.
(This Step only need to be done once)
Step 2: Make the Custom Fields Panel Visible in the WP Dashboard
Step 3: Create a Custom Field and Add the First Meta Description
With our custom field options now visible, we can now create a custom field key. We only need to create a new key once, after which we can assign a unique meta description value to that key on every post or page.
Here’s how:
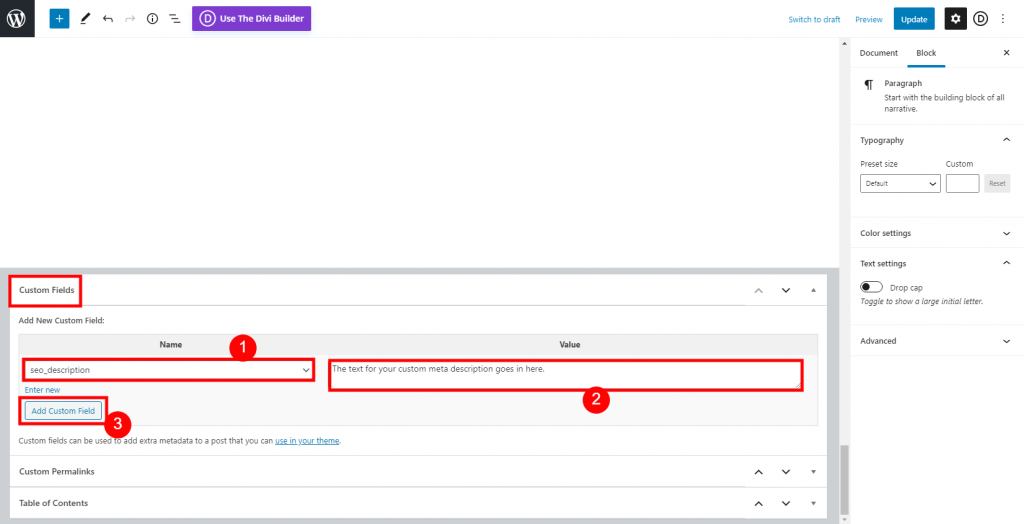
Open a post or page in the Default Editor (Gutenburg or Classic) that you want to add a meta description.
Scroll to the very bottom. You will now see a Custom Fields meta settings panel. You may need to expand it.
Select Enter new.
In the Name field, enter the key text: seo_description
In the Value field, enter your custom meta description text
Select the Add Custom Field button
Save via the usual Update or Save draft button
We’ve just done two things:
Firstly, added our own meta description to this specific Divi post / page.
Secondly, created a meta description custom field that is ready for use across our entire Divi website. So when adding a meta description to any subsequent posts/pages, it’s much quicker as the foundational work is already done.
(This Step only need to be done once)
Step 4: Add a Meta Descriptions to Any Subsequent Divi Post / Page
The Custom Fields meta box saves any custom field keys that have been added already. So instead of manually typing and adding the key again every time, it will show the seo_description key as an option in the drop down menu.
With Steps 1-3 completed, here’s how to add meta descriptions in any subsequent Divi posts / pages:
Open a post or page in the Default Editor (Gutenburg or Classic) that you want to add a meta description
Scroll down to the Custom Fields meta settings panel. You may need to expand it
In the Name field, select seo_description from the drop-down menu
In the Value field, enter your custom meta description text
Select the Add Custom Field button
Save via the usual Update or Save draft button
Step 5: Verify That It’s Working
A meta description is not physically visible on a page. We can use a tool to help us make sure it’s there.
We’ve just added added custom meta descriptions in Divi without the need for a plugin or playing around with code in theme files.
What’s great is that this tutorial sets the foundation. For any future meta descriptions, you’ve done most of the work already. Then it becomes just as easy as using a plugin like Yoast for meta descriptions. But of course, this method saves you the bloat of another plugin.
Plugins > Add New > Search Duplicator (by Snap Creek) Install > Activate In Left Side Menu of WordPress Click on Duplicator Create New > Next > Ck Yes and Click Build (If you site exceeds the free version, you may need to pay for this plugin)
Download the Installer & Archive to your computer. Upload to the root directory of the url where you are moving the site. Note: quicker upload speed through cPanel File Manager vs FTP client
Then in your browser goto yourdomain.com/installer.php If you have a current website at this domain, it will overwrite it. You will see Step 1 (You can view options and make any changes there that you prefer) Click Next Step 2 Install Database If you do not already have a database at this location you will need to choose: Login to your cPanel > MSQL Databases > Create New > enterNameYouChoose > goback > MySQL Users Add New > websitePrefix_enterNewUserName > Enter password twice > Create User > GoBack Add User to Database > choose user you just created & then DB you just created > Add Action > Create New Database > Host localhost > Database yoursitename_db > User createaname > Password CreateAPassword (make sure you save this information for later) > Add > Click All Privileges > Make Changes Put this information in STep 2 under Basic tab > Validate > Next > OK Step 3 Update Data > Next Step 4 > Next
Step 1: Check PHP configuration in your hosting’s Cpanel if “UPLOAD_MAX_FILESIZE” and “POST_MAX_SIZE” are set greater than your file’s size or 512 MB. To get more information you might contact your hosting company.
Step 2: Now you need to install a little bit older version of the All-in-One WP Migration plugin. You can download V7.5 from here.
Step 3: Go to WordPress Dashboard > Plugins > Add New > Upload Plugin > Choose File > Selected All-in-One WP Migration File Extension that you just download > Install Now.
Step 4: After installation is finished, activate the plugin and go to All-in-One WP Migration again and import your .wpress file. Now the problem should be fixed.
This is the first way to fix All-in-One WP migration Stuck at 100%
NUMBER 2 FIX Upload Backup & Restore
Step 1: First of all, export your .wpress file locally using the “Export” option
Step 2: Login to FTP using FileZilla or any other File Transfer Protocol Software to access the hosting files of your live server.
Step 3: Go to the “backup” directory of the All-in-One WP Migration Plugin; wp-content/ai1wm-backups/ and upload your .wpress file
Step 4: Now you need to restore it. Go to your WordPress Dashboard > All-in-One WP Migration > Backups, and you will find your .wpress file which is available there. Click on the “Restore” option Step 5: After some time, you will get the below popup. Click on “Proceed” to continue: Step 6: After a few minutes later, everything is done!:
Login to AMP –> WHM –> List Accounts –> cPanel of domain to secure Under Security –> SSL/TLS status –> Run Auto SSL
Next…. You will have to force browsers to use the https IF you have a handwritten website: Download .htaccess from your public_html folder Add this code at the top of the file
October 2020 Google updated Analytics to version 4. AND Of course they have moved things!!! Ugh Login to your Gmail and then go to Google.com/analytics
Sign in to your Analytics account.
Click Admin.
Select an account from the menu in the ACCOUNT column.
Select a property from the menu in the PROPERTY column.
Choose Data Stream Webpage
Tagging Instructions Choose Globle Tag and Copy
Go to your WordPress –> Plugins –> new search for insert header footer (by ) Install & Activate
Go to Settings –> Insert Headers and Footers –> Scripts for Footer & paste the code from Google Analytics
BUT a bunch of things are missing!!!!!! To force analytics to use version 3…. 1. Click Add Property 2. Enter Property Name 3. Enter Time Zone 4. SELETCT CREATE A UNIVERSAL ANALYTICS PROPERTY 5. Enter URL 6. CHOOSE CREATE A UNIVERSAL ANALYTICS PROPERTY ONLY!!!!! Now your Audience & Acquisition & Behavior Folders are all back!! Yea!
The only updated source I could find was this…..thankfully!
In Plugins Search for New – Contact Form Choose Contact Form 7 by Tokayuki Install > Activate > Settings Click on Contact Form 1 Update Tabs
Mail
Check the TO field and make sure the auto-fill correctly filled the email that you wish to receive these submissions.
Also check the FROM – if it entered an email that does not exist, go to the CPanel control panel and under “mail” either add that email (or one you prefer) OR under “mail” choose forwards and create a forward to one of existing email accounts if you don’t to have a new account to check
Place on website
Look towards the top of the page and copy the shortcut code. Click “save” Then goto your contact page & add paste this code in your page using the “html” view
Find the root directory of you website (normally public_html)
Double click on public_html to open the folder
Click on the first file/fold in the directory – hold your shift key – click on the last file/folder in that directory – all should be highlighted
Right mouse click on any of the highlighted files and a menu should appear
Choose Compress
For windows, I choose “Zip Archive”
Click Compress Files
It will name the zip after the first file/fold in the directory – my files was cgi-bin.zip
Rename to whatever is relevant i.e. domainname-backup-date.zip
Right mouse click on file & download your computer
Next find your database name by looking in your wp-config file (double-click will download the file) open with note-pad and look for DB_NAME
BACK UP DATABASE
Go back to cPanel
Under Databases choose phpMyAdmin
On the left menu find the database that is used by your WordPress Site (DB_Name above)
Click once on the name all tables should now show on the left and be highlighted
Click Export from the top menu
Quick – display only the minimal options
SQL format
Click GO
MOVE TO SECURE LOCATION
All files that we download should show on the bottom bar of your browser (if they are not there, look in your download fold on your machine)
Right click on one and choose open in folder
Highlight and move these files to a location you will remember. It is always a good idea to keep several copies in different locations – on your hard drive, on an external hard drive that is not normally connected to your computer, and on the cloud as well
Then to move to a new domain name:
Upload the zip and extract Create a new database, user name and assign user to database Import database
After you import your database, go to the wp_options table and select Edit. You need to change the location of your website in this table.
Locate the words ‘siteurl’ and ‘home’.
For siteurl, under option_value, replace the old domain name with the new one. Press enter to save.
Next for home, repeat the same step. Replace the domain name with the new one and hit enter.
Go to cPanel public_html > wp-config.php. Right-click and edit this file. If you’re using FTP, you need to download the file, and open it in any text editor to make the changes.
Find the following lines:
update the database user & password
More Info: https://blogvault.net/moving-wordpress-site-to-another-domain/